Your website may already look professional, but if it loads slowly or faces regular downtime, many visitors simply leave without waiting longer. That small hosting problem quietly affects SEO rankings, customer trust, conversions, and long term website growth continuously.
That is exactly why we did not depend only on promotional claims or temporary benchmark screenshots while comparing these hosting providers. We tested real website speed, uptime stability, server response, and traffic handling using GTmetrix, PageSpeed Insights, and uptime monitoring tools carefully.
This comparison helps bloggers, startups, businesses, and WordPress users choose hosting more confidently based on practical performance, security, scalability, support quality, and long term website reliability instead of confusing marketing promises and unrealistic unlimited hosting advertisements.
What Is Web Hosting in Hyderabad?
If you want your website to stay online continuously, load faster for visitors, and remain accessible anytime, you first need reliable web hosting. Web hosting simply stores your website files, images, databases, and applications on secure internet connected servers permanently.
For Hyderabad businesses, bloggers, startups, and online stores, reliable hosting improves website speed, uptime stability, SEO visibility, visitor trust, and smoother online performance regularly. Modern hosting providers additionally offer NVMe SSD storage, SSL security, backups, caching systems, and scalable infrastructure for growing websites consistently.
How We Selected These Web Hosting Providers
Choosing reliable web hosting becomes difficult because almost every provider promises faster speed, stronger security, and better uptime. That is why we tested real website performance instead of depending only on promotional marketing claims.
We compared hosting providers using GTmetrix, Google PageSpeed Insights, uptime monitoring tools, WordPress performance testing, server response analysis, and practical traffic handling tests suitable for Hyderabad businesses, bloggers, startups, and growing online websites regularly.
| Selection Factor | What We Checked | Why It Matters |
| Website Speed | GTmetrix, LiteSpeed, caching, NVMe SSD performance | Faster websites improve SEO rankings and visitor experience |
| Uptime Reliability | UptimeRobot monitoring and server stability | Stable uptime keeps websites accessible continuously |
| Customer Support | Live chat quality and response speed | Faster support solves technical issues quickly |
| Pricing Value | Starting pricing and renewal transparency | Better pricing improves long term affordability |
| Security Features | SSL, backups, malware protection, firewall tools | Security features protect websites from online threats |
| Scalability | VPS, cloud upgrades, traffic handling capability | Scalable hosting supports growing website traffic |
| Ease of Use | cPanel usability and beginner friendly setup | Easier management simplifies website handling |
| User Reputation | Customer reviews and long term feedback | Reviews show practical hosting reliability consistently |
We also reviewed migration support, hosting stability, website loading consistency, server response times, and long term usability before selecting these hosting providers carefully for Hyderabad website owners and online businesses.
5 Best Web Hosting in Hyderabad, India in 2026
Fast, secure, and reliable hosting improves website speed, SEO visibility, uptime stability, customer trust, and smoother online growth for businesses, bloggers, startups, and WordPress websites consistently.
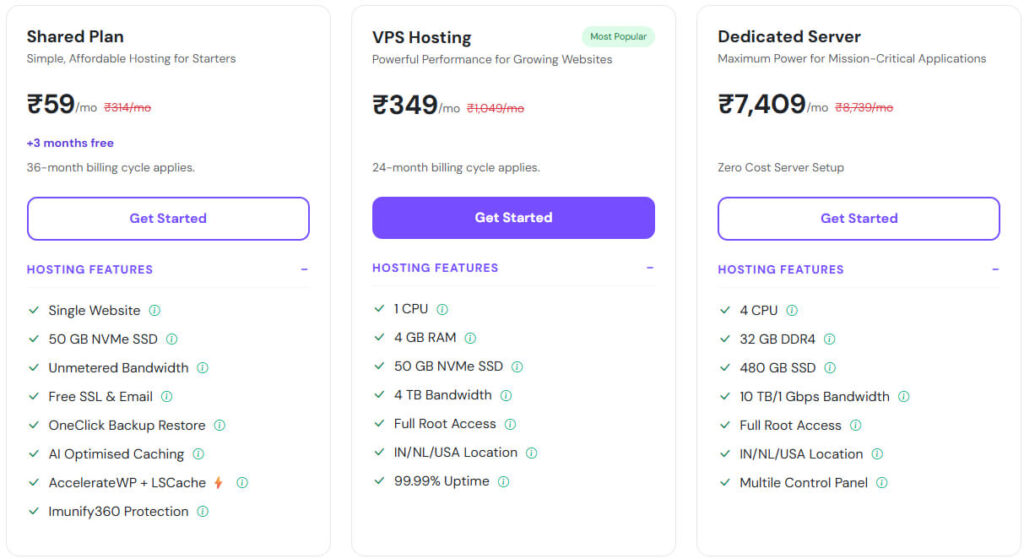
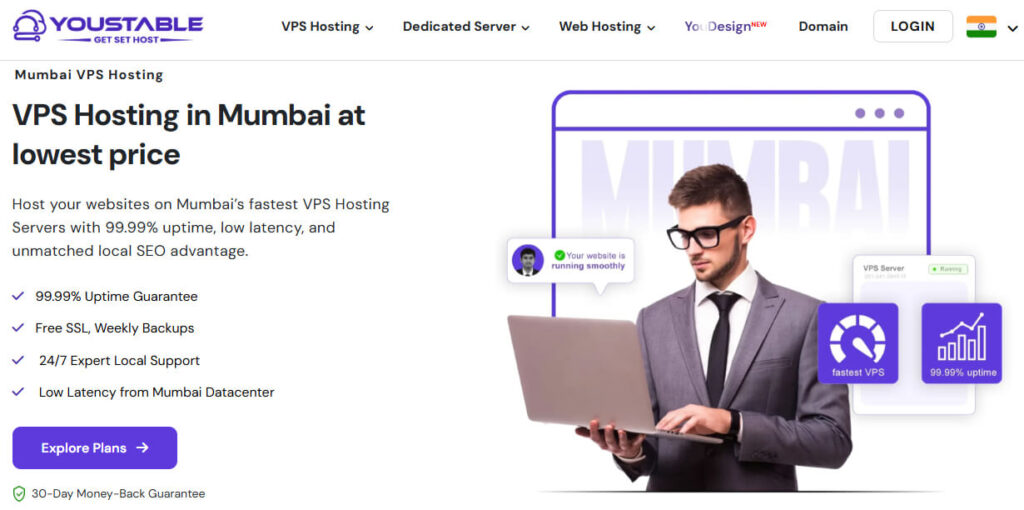
1. YouStable – Accepts UPI Payments + Free Domain + 80% OFF
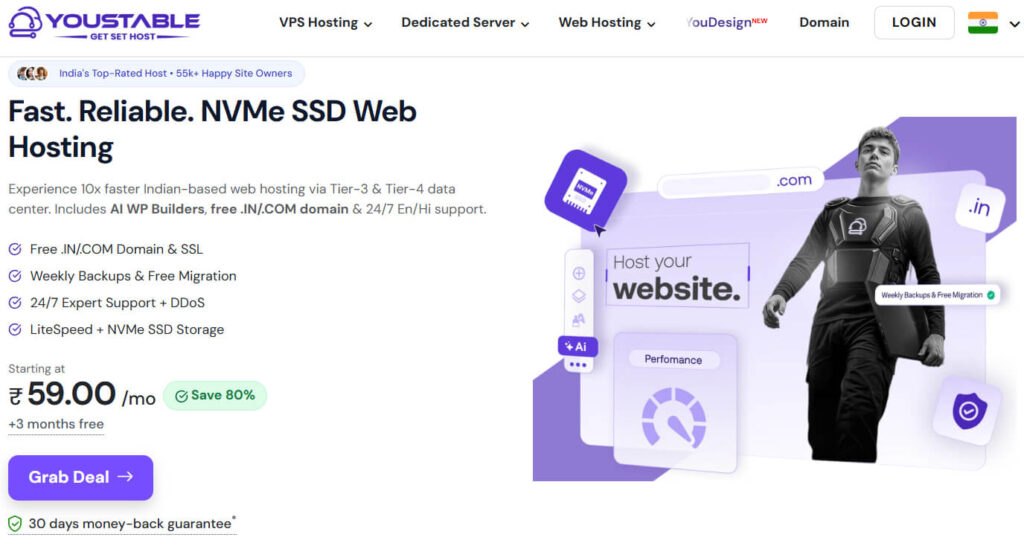
YouStable mainly works well for people wanting affordable hosting without compromising website speed, uptime stability, security, or beginner friendly website management. Bloggers, startups, WordPress users, and growing businesses usually prefer it for smoother long term website performance consistently.
One reason many Indian users choose YouStable is its balance between modern hosting technology and easier usability. NVMe SSD servers, LiteSpeed optimization, AI caching, free SSL, migration support, and Hindi-English assistance improve overall website management more comfortably.
Overall: If you want affordable hosting with faster speed, stable uptime, modern features, and easier website management, YouStable becomes a reliable long term hosting choice for growing websites and WordPress projects consistently.
Key Features
YouStable mainly helps beginners, bloggers, startups, and WordPress users searching for affordable hosting with faster website performance and simpler website management.
Pros
Cons
YouStable highlights NVMe SSD storage, LiteSpeed optimization, free migration, AI caching, and affordable pricing on its hosting pages.
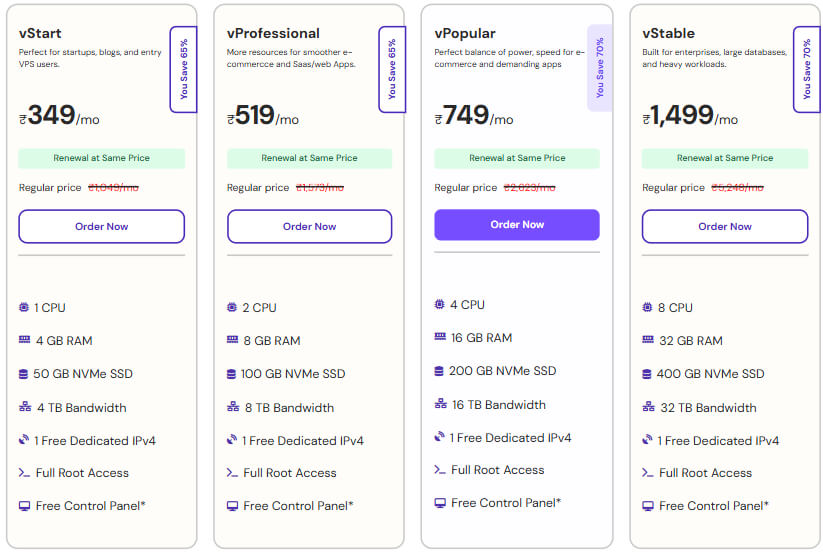
Plans & Pricing
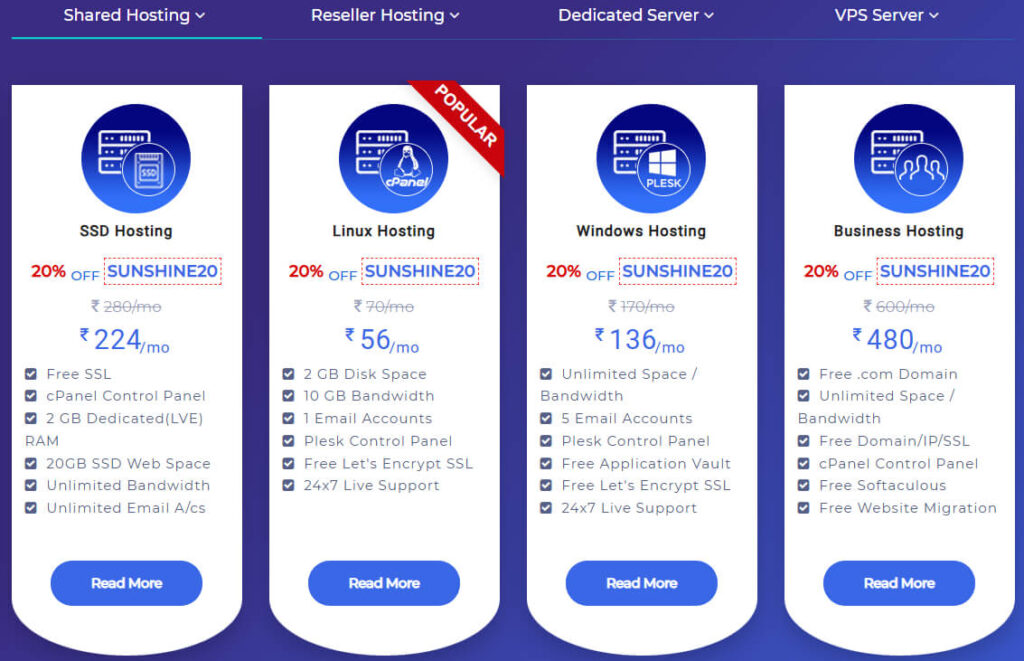
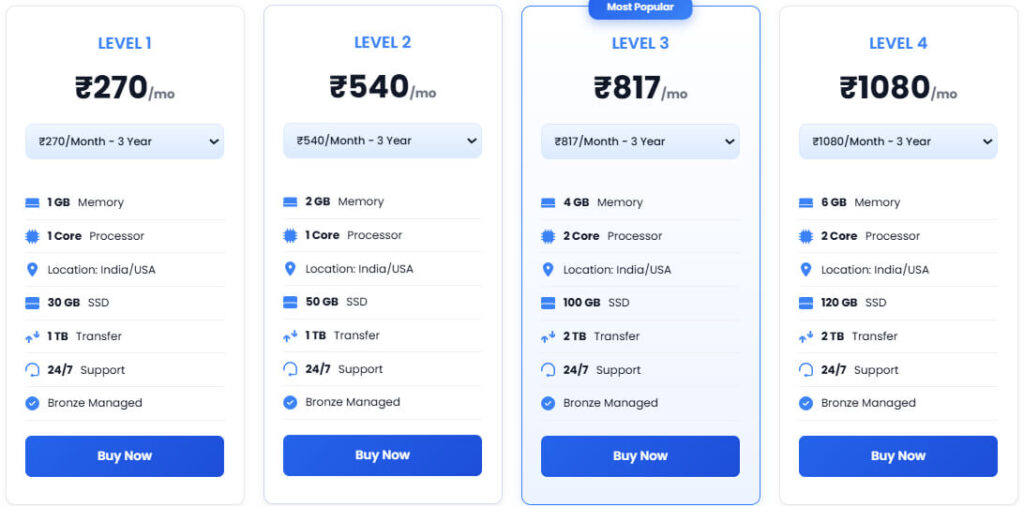
2. RDSindia – Flexible VPS Hosting For Growing Businesses

RDSIndia mainly suits businesses and enterprise users needing stronger hosting flexibility instead of simple beginner focused shared hosting environments. Websites handling applications, business systems, VPS hosting, or resource intensive projects usually require this type of scalable server infrastructure regularly.
The provider supports Linux hosting, Windows hosting, VPS servers, dedicated hosting, cPanel, Plesk, and customizable server environments suitable for businesses managing advanced applications, enterprise websites, and higher resource hosting requirements more efficiently.
Overall: If your business requires dedicated resources, server customization, VPS scalability, and stronger enterprise hosting flexibility, RDSIndia becomes more suitable than standard beginner focused shared hosting environments for long term business infrastructure management.
Key Features
RDSIndia mainly supports businesses and VPS users requiring flexible hosting infrastructure with stronger server customization and enterprise hosting compatibility.
Pros
Cons
Plans & Pricing

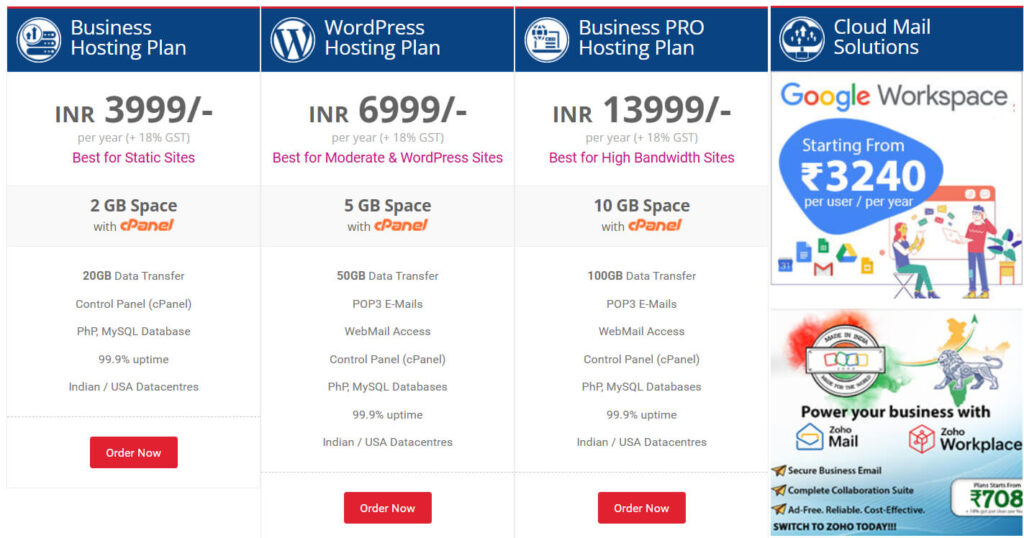
3. Rify – Managed Hosting With Local Hyderabad Support
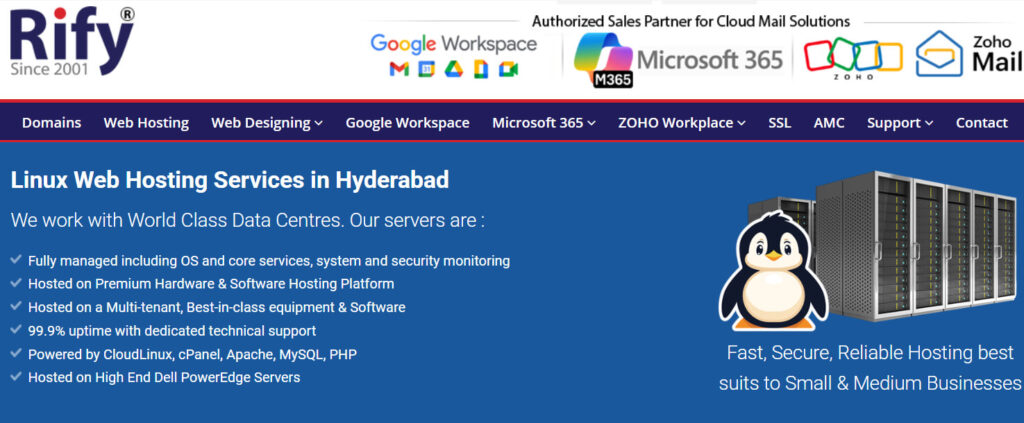
Rify Hosting mainly helps Hyderabad businesses wanting managed hosting support with localized assistance, stronger infrastructure stability, and professional website management instead of depending completely on self managed hosting environments requiring regular technical monitoring continuously.
Many local businesses prefer Rify because direct support and managed assistance simplify long term website management more comfortably. CloudLinux stability, Dell PowerEdge infrastructure, managed monitoring, and cPanel integration additionally improve reliability and smoother business hosting performance consistently.
Overall: If you prefer localized support, managed hosting assistance, and stable business infrastructure for professional websites, Rify Hosting becomes useful for Hyderabad businesses requiring smoother long term website management and uptime stability.
Key Features
Rify mainly focuses on Hyderabad businesses searching for managed hosting support with stronger server reliability and localized assistance.
Pros
Cons
Plans & Pricing
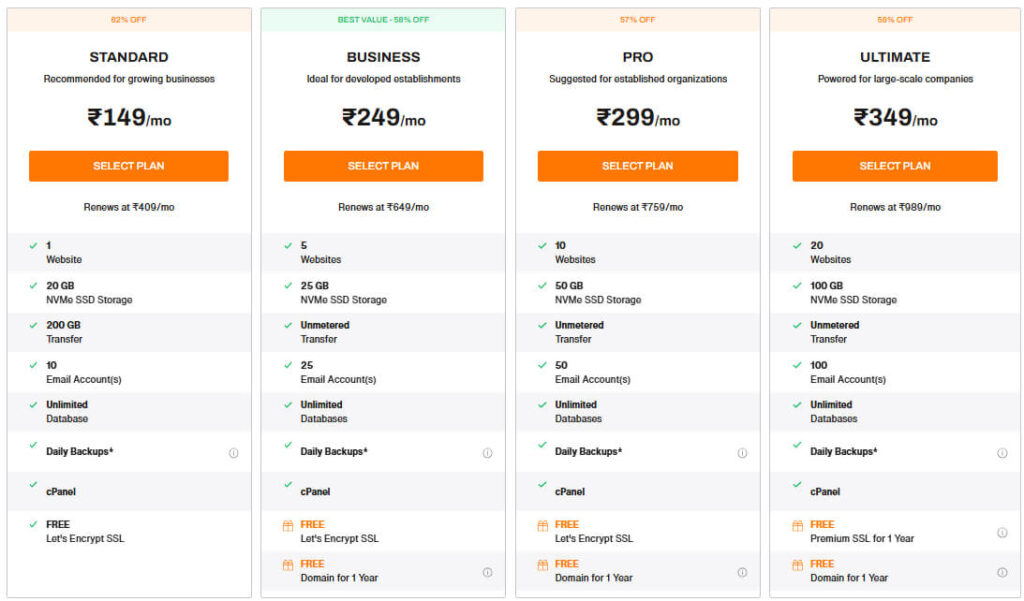
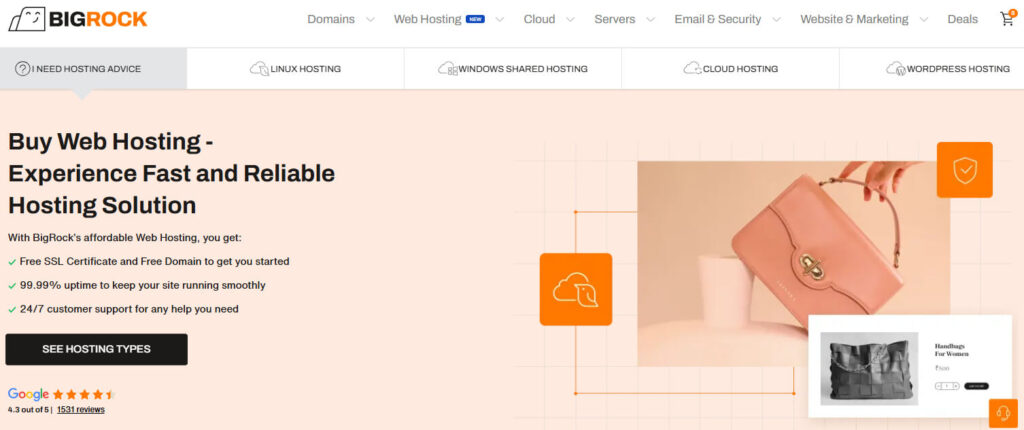
4. BigRock – Beginner Friendly Hosting With Easy Management
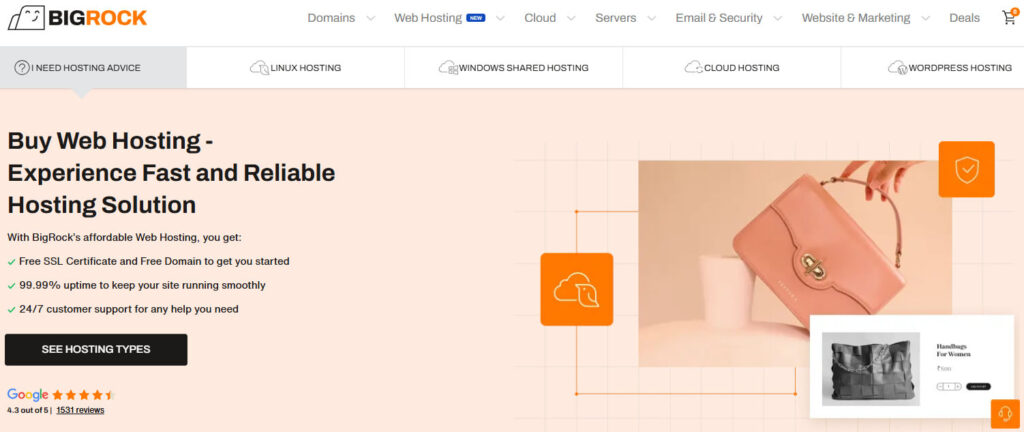
BigRock mainly attracts beginners, bloggers, startup owners, and smaller businesses searching for affordable hosting with simpler website management, essential hosting features, and beginner friendly tools suitable for launching websites without complicated technical setup requirements initially.
The platform simplifies website management using cPanel access, free SSL certificates, NVMe SSD storage, backups, domain services, and one click WordPress installation features helping first time website owners manage websites more comfortably and confidently online.
Overall: If you are starting your first blog, portfolio, startup website, or smaller online project, BigRock becomes a beginner friendly hosting option with affordable pricing and easier website management tools consistently.
Key Features
BigRock mainly helps beginners and startups searching for affordable hosting with beginner friendly website management and essential hosting features.
Pros
Cons
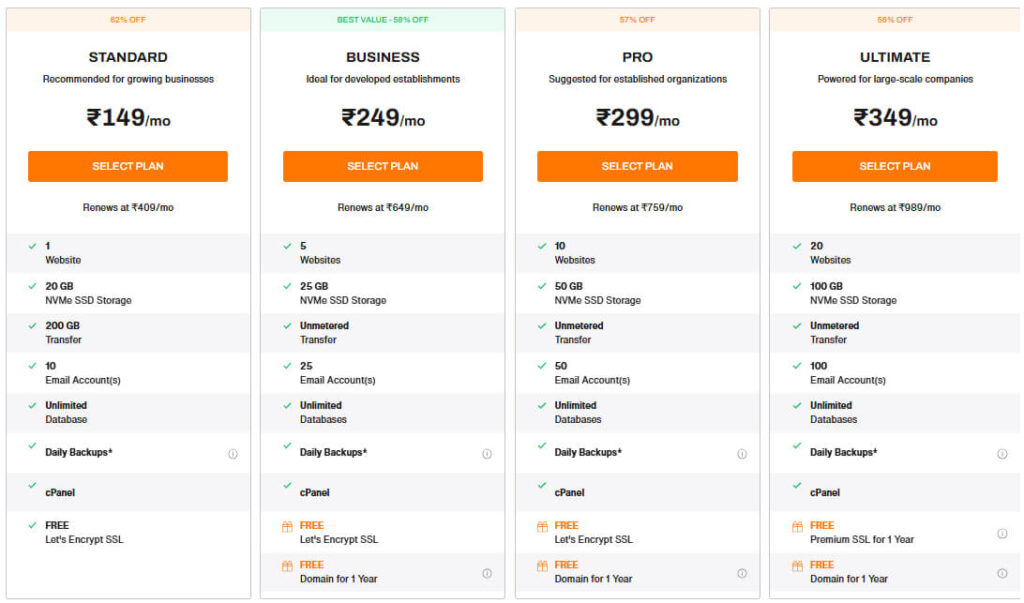
Plans & Pricing
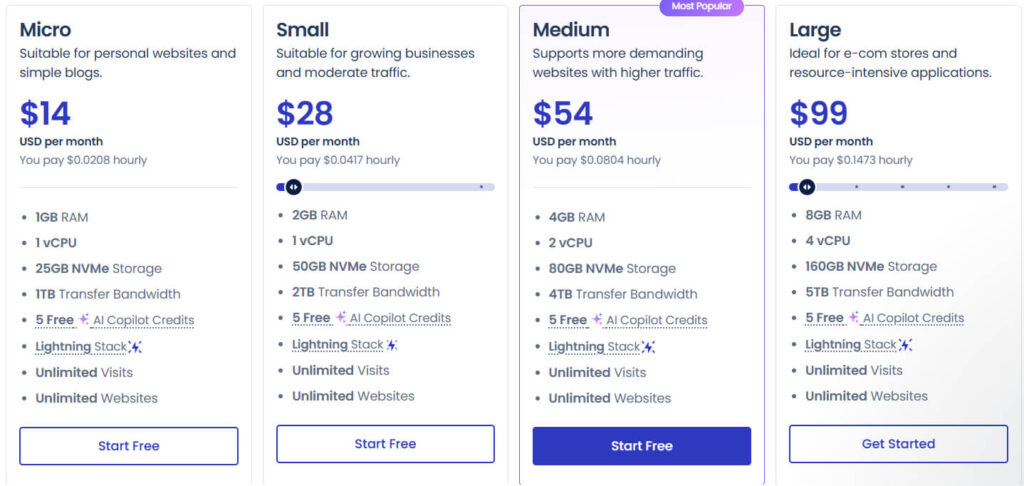
5. CloudWays – Scalable Cloud Hosting For High Traffic
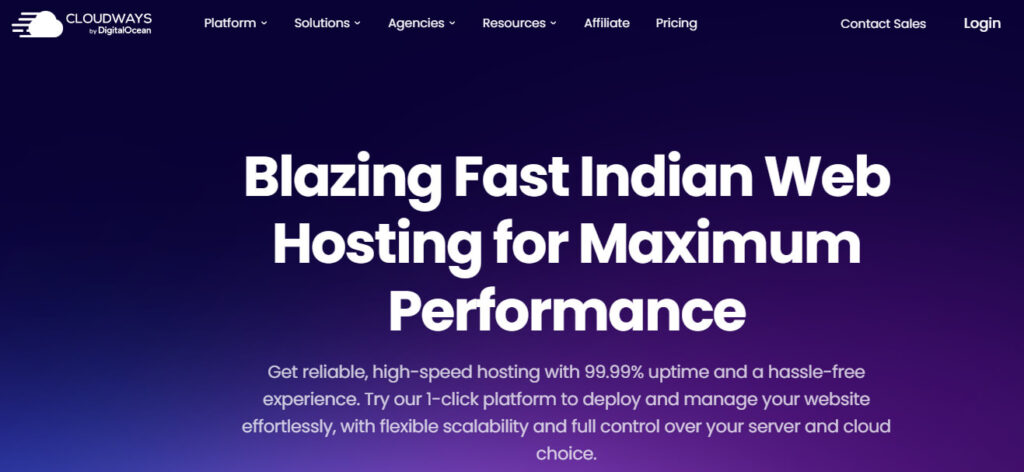
Cloudways mainly helps developers, agencies, ecommerce stores, and growing businesses requiring scalable cloud hosting with stronger website performance, dedicated resources, advanced caching systems, and smoother traffic handling during higher website workloads regularly.
One major advantage of Cloudways is scalability because resources can upgrade smoothly during website growth without difficult migrations or major downtime problems. Managed cloud infrastructure, Redis caching, CDN integration, and automated backups additionally improve performance stability significantly.
Overall: If your website handles higher traffic, ecommerce operations, or growing business applications, Cloudways becomes a strong cloud hosting solution offering scalability, flexibility, and stable long term website performance consistently.
Key Features
Cloudways mainly helps developers, agencies, and businesses searching for scalable cloud hosting with stronger performance and flexibility.
Pros
Cons
Plans & Pricing
How to Choose the Best Web Hosting in Hyderabad
Choosing the right web hosting provider is important because hosting directly affects website speed, uptime stability, SEO performance, security, and overall visitor experience. Businesses, bloggers, startups, and online stores should compare performance, support quality, scalability, pricing, and security features before selecting long term hosting services.
Important Things to Compare Before Choosing Hosting
| Feature | Why It Matters |
| Website Speed | Faster websites improve visitor experience and SEO rankings |
| Uptime Guarantee | Better uptime keeps websites accessible continuously |
| Storage Type | NVMe SSD storage improves speed and server performance |
| Customer Support | Fast support helps solve technical problems quickly |
| Security Features | Security tools protect websites from malware and attacks |
| Backup Availability | Backups help recover important website data easily |
| Pricing and Renewals | Renewal pricing affects long term hosting affordability |
| Scalability | Scalable hosting supports growing website traffic |
1. Check Website Speed and Uptime
Website speed and uptime are extremely important for SEO performance and visitor experience. Hosting providers using NVMe SSD storage, LiteSpeed servers, and optimized caching technologies usually provide faster loading performance and better website stability.
2. Choose Hosting According to Your Website Type
Different websites require different hosting resources depending on traffic, applications, and scalability requirements.
| Website Type | Recommended Hosting |
| Personal Blog | Shared Hosting |
| Business Website | Business Hosting |
| WordPress Website | Managed WordPress Hosting |
| Online Store | Cloud or VPS Hosting |
| High Traffic Website | Dedicated or Cloud Hosting |
3. Compare Customer Support Quality
Reliable customer support becomes important during downtime, migration issues, or technical hosting problems affecting website accessibility and performance.
4. Look for Useful Free Features
Many hosting providers include free features that reduce setup costs and improve hosting value for beginners and businesses.
| Free Feature | Benefit |
| Free SSL Certificate | Secures website connections |
| Free Domain | Reduces starting website cost |
| Free Migration | Simplifies website transfer |
| Free Backups | Protects website data |
| Free Email Hosting | Creates professional business emails |
5. Check Website Security Features
Website security helps protect customer information, website files, and business data from malware attacks and server vulnerabilities.
6. Compare Pricing and Renewal Costs
Low introductory pricing may look attractive initially, but renewal pricing also affects long term hosting affordability and business budgeting.
| Pricing Factor | What to Check |
| Starting Price | Initial hosting cost |
| Renewal Price | Long term hosting expenses |
| Included Features | SSL, backups, storage, emails |
| Refund Policy | Money back guarantee availability |
| Upgrade Cost | Scaling and resource upgrade pricing |
7. Choose Scalable Hosting Infrastructure
Growing websites require hosting providers allowing smooth upgrades without downtime or major performance problems.
8. Read Real User Reviews
Real customer reviews help understand actual hosting performance, uptime reliability, support quality, and long term service stability.
Reliable web hosting improves website speed, SEO visibility, customer trust, and overall online business growth. Hosting providers offering strong uptime, responsive support, NVMe SSD storage, and scalable infrastructure usually provide better long term website performance.
FAQs
1. Can I transfer my existing website to a new hosting provider easily?
Yes, most reliable hosting providers offer free or paid website migration services for transferring WordPress websites, databases, emails, and files without major downtime or complicated manual technical setup requirements regularly.
2. Which hosting is better for WordPress websites in Hyderabad?
WordPress websites usually perform better on hosting providers using LiteSpeed servers, NVMe SSD storage, optimized caching, and stronger uptime stability because these features improve speed, SEO visibility, and smoother website performance consistently.
3. What important features should businesses check before purchasing hosting?
Businesses should compare website speed, uptime reliability, scalability, support quality, and long term hosting stability carefully before selecting hosting services for professional websites and growing online business projects.
• Uptime Stability: Keeps websites accessible without frequent downtime problems regularly
• Scalable Infrastructure: Supports growing traffic and long term website expansion smoothly
• Security Protection: Protects websites from malware attacks and security vulnerabilities
• Responsive Support: Solves technical hosting problems more efficiently during emergencies
4. Does customer support quality really matter in web hosting?
Yes, reliable customer support becomes extremely important during downtime, migration problems, website errors, or server related technical issues because faster assistance helps businesses reduce website interruptions and maintain smoother online performance consistently.
Conclusion
Your website may already have good design, useful content, and professional branding, but if the hosting stays slow or unstable, visitors usually leave before exploring your website properly. That single problem quietly affects SEO rankings, customer trust, conversions, and overall business growth continuously.
That is exactly why choosing reliable hosting becomes far more important than simply selecting the cheapest plan available online. Faster loading speed, stable uptime, strong security, responsive support, and scalable infrastructure together create smoother website performance and better long term online growth consistently.
After comparing practical speed performance, uptime stability, support quality, scalability, and overall hosting reliability carefully, YouStable stands out as one of the strongest hosting choices for bloggers, startups, businesses, WordPress websites, and growing online projects searching for stable long term website performance.
Comparison Table
Choosing hosting becomes much easier when pricing, website performance, uptime stability, scalability, customer support, and long term usability are compared properly according to your actual website requirements.
| Provider | Starting Price | Best For | Key Highlights |
| YouStable | ₹59/month | Beginners, bloggers, startups, WordPress websites | NVMe SSD storage, LiteSpeed servers, free SSL, migration support, AI caching |
| RDSIndia | ₹3,100/month (VPS) | Businesses, VPS hosting, dedicated server users | Linux-Windows hosting, VPS servers, cPanel/Plesk, customizable infrastructure |
| Rify Hosting | ₹3,999/year | Hyderabad businesses, managed hosting | CloudLinux servers, Dell infrastructure, managed support, stable hosting |
| BigRock | ₹149/month | Personal websites, blogs, smaller businesses | Budget friendly hosting, free SSL, NVMe SSD, beginner friendly cPanel |
| Cloudways | $14/month | Developers, agencies, WooCommerce stores | Managed cloud hosting, scalable resources, advanced caching, high uptime |
If you want affordable hosting with stable uptime, faster website speed, beginner friendly management, and long term website reliability, YouStable becomes one of the strongest choices for Hyderabad businesses, bloggers, startups, and growing WordPress websites consistently.


![5 Best KVM Windows VPS Hosting Providers [current_date format='Y, F']](https://wordpresshosting.host/wp-content/uploads/2025/06/Kamatera-Free-Cloud-Hosting-1024x598.png)
![HostGator vs Bluehost: The Perfect Web Hosting Comparison [current_date format='Y']](https://wordpresshosting.host/wp-content/uploads/2020/11/Hostgator-Vs-BlueHost-Perfect-Hosting-Plan-2020.jpg)
![HostGator vs Bluehost: The Perfect Web Hosting Comparison [current_date format='Y']](https://wordpresshosting.host/wp-content/uploads/2022/10/Install-WordPress-Locally.jpg)
![HostGator vs Bluehost: The Perfect Web Hosting Comparison [current_date format='Y']](https://wordpresshosting.host/wp-content/uploads/2022/10/istockphoto-1172944401-612x612-1.jpg)
![HostGator vs Bluehost: The Perfect Web Hosting Comparison [current_date format='Y']](https://wordpresshosting.host/wp-content/uploads/2022/10/Domain-Name-Management-1024x537.png)
![HostGator vs Bluehost: The Perfect Web Hosting Comparison [current_date format='Y']](https://wordpresshosting.host/wp-content/uploads/2022/10/money-back-guarantee-policy-1024x555.webp)
![HostGator vs Bluehost: The Perfect Web Hosting Comparison [current_date format='Y']](https://wordpresshosting.host/wp-content/uploads/2022/10/how-to-install-wp-onlocalhost.jpg)
![HostGator vs Bluehost: The Perfect Web Hosting Comparison [current_date format='Y']](https://wordpresshosting.host/wp-content/uploads/2022/10/cybersecurity-vs-information-security-illustration-1024x536.jpg)
![HostGator vs Bluehost: The Perfect Web Hosting Comparison [current_date format='Y']](https://wordpresshosting.host/wp-content/uploads/2022/10/how-to-register-a-domain-name-1024x536.jpg)
![HostGator vs Bluehost: The Perfect Web Hosting Comparison [current_date format='Y']](https://wordpresshosting.host/wp-content/uploads/2022/10/how-to-monitor-wordpress-website-server-uptime-og.png)
![HostGator vs Bluehost: The Perfect Web Hosting Comparison [current_date format='Y']](https://wordpresshosting.host/wp-content/uploads/2022/10/web-hosting-money-back-guarantees-1300x620-1-1024x488.jpg)